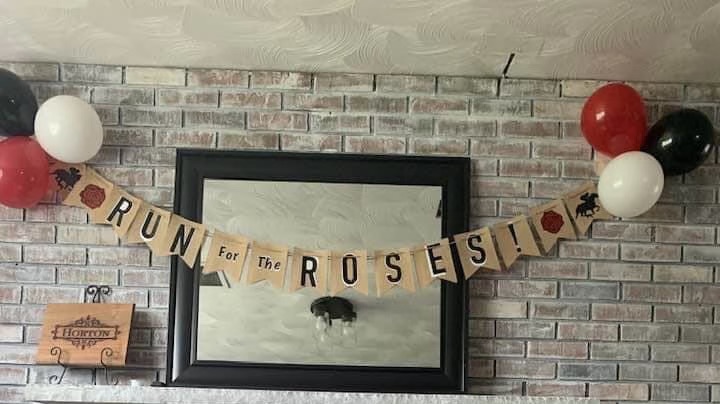
Our family decided to have a little Kentucky Derby party this past April and since it was last minute the decorations were very limited. Casey was able to quickly put together this banner for the party. The banner was bought at Wal-Mart. It is a burlap flag banner. Outside of the burlap banner everything else was done using a Cricut Explore Air 2. The black, white and red are all vinyl. Since we were time constrained, we did not get pictures of everything. We will be doing some more cricut items and going into more depth using the cricut. Here is the basic rundown of what we did.
Roses and Horses
The two horses were found using an internet search and uploaded onto the cricut. They were then sized and cutout. Once the vinyl cutouts were finished, they were peeled and attached straight to the burlap. This gave us the two end pieces. Now the roses were a little bit more complex in getting them finished. The black background on the rose was done first with just cutting the outline of the rose into the black vinyl. The vinyl black rose without any detail was then taken and attached to the burlap. This is what is giving the black color in the rose. The red rose was done using the same size as the black rose except all of the detail of the rose is cut as well. Then the tedious part of the project is in removing all the little detail out of the red rose. The removing of the details is what gives the rose the ability to show the black background through the red color. Removing the red vinyl is done with tweezers. This process needs to be slowly so the vinyl that is left is not ripped. If you go to fast in removing the details and rip the vinyl then the whole thing needs to be done over again. Once finished the red detail rose and black undetailed rose is set onto the burlap. The black goes down first. The red rose goes straight on top of the black rose. Since the size of the two roses is the same it should be easy to orientate the two roses and set the red right down on the black. This give the banner a splash of color and nice little touch of the roses for the races namesake.
Letters
The letters were done it two parts. The white and black is actually the same thing. All of the letters were cut out once in white and once in black. The white letters were used as the background. So certain pieces were left in like the middle part in the R. This gave the white coming through as the background. Aside from the little details like that, the white is the same letters as the black but the black letters cover up the white. Once the white vinyl letters are cut out then the cricut is used to cut out the same letters and size in black vinyl. The black vinyl letters have all of the vinyl removed that are not used in each letter. The white vinyl letters are placed on the burlap. The black letters are then placed onto the white letters but just a little offset from the black to give the white accents of the black letters. The “For”, “The” and explanation point are done the same way. Two “for”, “the” and explanation points were made. One white and one black. The black vinyl pieces are removed to leave what we want to see as in the letters in the words. The white is cut in a way to let some of the white come through in spots such as the middle piece in the letter “O”. This gives a sense of depth in the banner.

Lastly the three balloons matching the same color pattern as the vinyl were used on the two sides to help hide the tape being used to keep the banner hang up. This little detail hides the tape but also adds some flair to the overall banner. Since this was a party, the balloons enhanced the banner to help tie it into the other party decorations.
